Transfer
This guide is for operators (admin or employee) who need to move files between endpoints with the Desktop App Transfer tool — over the secure, accelerated ASC protocol.
Typical operations:
- Download from / upload to a site — Sync material between main (HQ) storage and a remote office or cloud site.
- Push to / pull from a remote user — Exchange files with a user who has one or more shares mapped locally (Desktop App or User server).
You can use either the workspace endpoint (main site / HQ storage) or a remote site as source or destination. Transfers are peer-to-peer between the selected endpoints; they do not have to pass through HQ when both sides are sites or a site and a mapped user.
Note: Creating transfers in the Transfer tool is currently available in the Desktop App only. Web-based transfer creation may be added in a future version. You can still monitor and manage running jobs on the web.
Prerequisites
- Signed in to the Desktop App as an administrator or employee.
- For site transfers: sites and site servers configured — see Site administration.
- For remote user push/pull: the user has mapped the relevant share(s) locally, ideally with a User server for unattended 24/7 access. Read access on the mapping allows operators to pull (upload from the user); write access allows push (download to the user).
Create a transfer
Open Transfer in the Desktop App top menu. You get a dual-pane browser: source on the left, destination on the right.
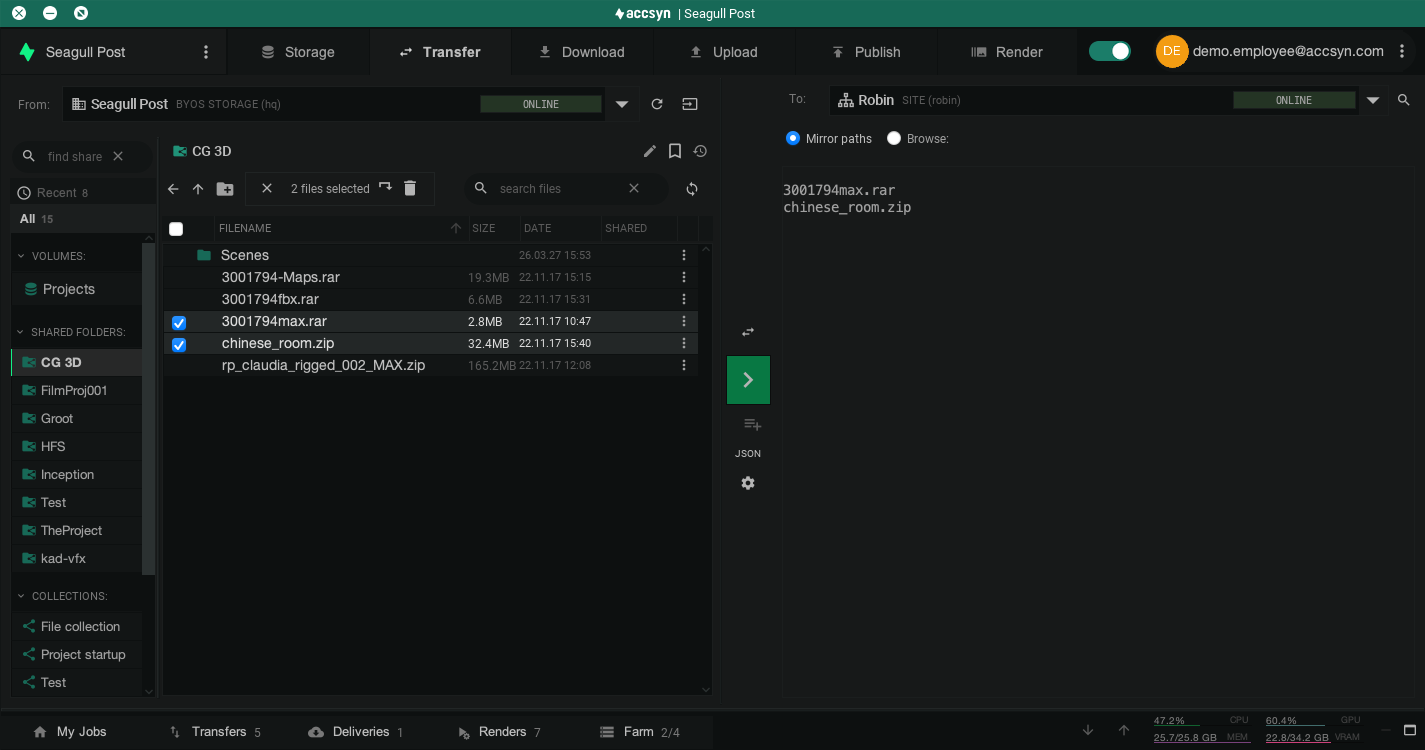
Example: transferring selected files from HQ storage to a remote site with mirror paths enabled.
- Select the source endpoint on the left (main storage / HQ, a site, or a user with mapped shares), then select the file(s) and/or folder(s) to send.
- Select the destination on the right (main storage / HQ, a site, or a mapped user).
- If the destination has a matching share context (volume served on that site, or a share the user mapped locally), Mirror paths is available and selected by default — the relative folder structure is preserved. Otherwise use Browse to choose a destination folder.
- Click the green > button in the middle to start the transfer.
Progress appears under My Jobs / Transfers in the bottom panel. Pause, resume, abort, and re-queue from there or from Job & queue management.
Related articles
- Site administration — Add sites and site servers for office/cloud sync.
- Hosts — Install a User server and map shares for remote push/pull.
- Job & queue management — Monitor and prioritise transfer jobs.
- File sharing — Shares, ACLs, and local mapping concepts.
- Remote office sync — API-driven site synchronisation tutorial.